Monday, September 17, 2018

WSO2 ESB - Data Mapper Mediator

Scenario:


Tools:

  • WSO2 ESB 5.0.0
  • WSO2 Developer Studio ESB Tool 5.0.0

Creating the ESB configuration project


  1. 1. Open the WSO2 Developer Studio ESB Tool.
  1. 2. Right click on the Project Explorer area, click New, and then click  ESB Solution Project 
  2. 3. Enter a name for the project, and untick Create Connector Exporter Project (since you do not need Connectors in your configuration)  in the following wizard page.
        4. click Finish.You view the following project files created in the Project Explorer tab.
  1. 5. Right click DataMappingExample project workspace file, click New, and then click REST API, to create a new REST API project in WSO2 ESB.
  2. 6. Select Create A New API Artifact, and then click Finish as shown below.
  3. 7. Enter a name for the Synapse API Artifact, enter /convertMenu for Context to configure the REST API project to listen for POST requests on the /convertMenu URL, and then click Finish  as shown below.
  4. 8. Drag and drop a Data Mapper mediator and a Respond mediator as shown below. 
  5. 9. Click on the API Resource, and then click on its Properties tab, and select True as the value for the Post method as shown below, to create the API resource  listening to POST requests. 

  6. 10. Double click on the Data Mapping mediator. You can see a dialog box to create a registry resource project.

  7. 11. Enter a name for the configuration, and point the Registry Resource project to save it.

  8. 12. This configuration name is the prefix used for the configuration files that you deploy to the ESB server related to the Data Mapper. Since you created an ESB Solution project, it directly points you to that project to save in it. Otherwise, you need to click the Create new project link, to create a new Registry Resource project and then point to it.

  9. 13. Click  OK. You view the following Data Mapper diagram editor in the new WSO2 Data Mapper Graphical perspective. 

  10. 14. Create an XML file by copying the following sample content of a food menu and save it in your local file system.

  1. Use this sample XML message to load the input format to the Data Mapper editor.   
  1. <?xml version="1.0" encoding="UTF-8"?>
    <breakfast_menu>
       <food>
          <name>Belgian Waffles</name>
          <price>$5.95</price>
          <description>Two of our famous Belgian Waffles with plenty of real maple syrup</description>
          <calories>650</calories>
          <orgin>Belgian</orgin>
          <veg>true</veg>
       </food>
       <food>
          <name>Strawberry Belgian Waffles</name>
          <price>$7.95</price>
          <description>Light Belgian waffles covered with strawberries and whipped cream</description>
          <calories>900</calories>
          <orgin>Belgian</orgin>
          <veg>true</veg>
       </food>
       <food>
          <name>Berry-Berry Belgian Waffles</name>
          <price>$8.95</price>
          <description>Light Belgian waffles covered with an assortment of fresh berries and whipped cream</description>
          <calories>900</calories>
          <orgin>Belgian</orgin>
          <veg>true</veg>
       </food>
       <food>
          <name>French Toast</name>
          <price>$4.50</price>
          <description>Thick slices made from our homemade sourdough bread</description>
          <calories>600</calories>
          <orgin>French</orgin>
          <veg>true</veg>
       </food>
       <food>
          <name>Homestyle Breakfast</name>
          <price>$6.95</price>
          <description>Two eggs, bacon or sausage, toast, and our ever-popular hash browns</description>
          <calories>950</calories>
          <orgin>French</orgin>
          <veg>false</veg>
       </food>
    </breakfast_menu>
  2. 14. Right-click on the top title bar of the Input box and, click Load Input. The operation palettes that appear on the left-hand side allows you to provide the input message format to begin the mapping
    • XML: to load a sample XML message and WSO2 Data Mapper Editor will generate the JSON schema to represent the XML according to the WSO2 Data Mapper Schema specification.  
    • JSON: to load a sample JSON message. 
    • CSV: to load a sample JSON/CSV message.  For CSV you need to provide the column names as the first record.
    • XSD: to load an XSD schema file, which defines your XML message format.
    • JSONSCHEMA: to load a JSON schema for your message according to the WSO2 Data Mapper schema specification.
    • CONNECTOR: to map a message, which is an output of a Connector. Select the Connector Type  in the Input box, and it will list down all available connectors. Then, select the operation from the menu that appears in front of Data Mapper mediator. 

  3. 15. Click the file system link in Select resource from, select the XML file you saved in your local file system and click Open.  
    You view the input format loaded in the Input box in the editor.

    1. Select XML as the Resource Type.
  4. 16. Create another XML file by copying the following sample content of a food menu, and save it in your local file system.
  5. Use this sample XML message to load the output format to the Data Mapper editor. 

  6. <?xml version="1.0" encoding="UTF-8"?>
    <menu>
       <item>
          <name>Belgian Waffles</name>
          <price>$5.95</price>
          <calories>650</calories>
          <orgin>Belgian</orgin>
          <veg>true</veg>
          <description>Two of our famous Belgian Waffles with plenty of real maple syrup</description>
       </item>
       <item>
          <name>Strawberry Belgian Waffles</name>
          <price>$7.95</price>
          <calories>900</calories>
          <orgin>Belgian</orgin>
          <veg>true</veg>
          <description>Light Belgian waffles covered with strawberries and whipped cream</description>
       </item>
       <item>
          <name>Berry-Berry Belgian Waffles</name>
          <price>$8.95</price>
          <calories>900</calories>
          <orgin>Belgian</orgin>
          <veg>true</veg>
          <description>Light Belgian waffles covered with an assortment of fresh berries and whipped cream</description>
       </item>
       <item>
          <name>French Toast</name>
          <price>$4.50</price>
          <calories>600</calories>
          <orgin>French</orgin>
          <veg>true</veg>
          <description>Thick slices made from our homemade sourdough bread</description>
       </item>
       <item>
          <name>Homestyle Breakfast</name>
          <price>$6.95</price>
          <calories>950</calories>
          <orgin>French</orgin>
          <veg>false</veg>
          <description>Two eggs, bacon or sausage, toast, and our ever-popular hash browns</description>
       </item>
    </menu>
  7. 
    
  8. 17. Right-click on the top title bar of the Output box and, click   Load Output  as shown below . The operation palettes that appear on the left-hand side allows you to provide the output message format.
    Click the file system link in Select resource from, select the XML file you saved in your local file system, and click Open.  You view the input format loaded in the Output box in the editor as shown below.
  9. 
    
  10. 18. Check the Input and Output boxes with the sample messages, to see if the element types (Ex:Arrays, Objects and Primitive values) are correctly identified or not. Following signs will help you to identify them correctly. 
  11. {} - represents object elements
  12. [] - represents array elements
  13. <> - represents primitive field values
  14. A - represents XML attribute values

  15. 19. Do the mapping as preferred using operators as shown in the example below.
  16. You can only connect primitive data values such as Strings, numbers, boolean and etc. You cannot map Array and object values.
  17. The mapping done in the below example is that, name is mapped via uppercase operator and calories undergoes a mathematical calculation to get the output as follows:
    output calories =Round( (calories*1.13) + 6.75)


  18. 20. Press Ctrl+S keys in each tab, to save all the configurations

Deploying the configurations


  1. 1. After creating the Data Mapper configurations, follow the steps below to deploy the created REST API and the configurations in the WSO2 ESB server by including them in a C-App.
  2. 2. Open the WSO2 Developer Studio ESB Tool.
  3. 3. Expand the C-APP project the was created when you created the ESB solution project (Ex: DataMapperExampleCompositeApplication) and double-click on the POM file. You view the following screen to select project files into the C-APP.
  4. Configuration: Script file that is used to execute the mapping.
  5. Input schema: JSON schema which represents the input message format.
  6. Output schema: JSON schema which represents the output message format.

  7. 4. You need to refresh the screen to view the registry resource files. Once you refresh the screen, you can see all the artifacts in the workspace.
  8. Select the REST API file and the three registry resource files containing the mapping configuration, input schema, and output schema.
  9. 5. Click on the Data Mapper mediator.  You can see the following in the Properties tab of the Data Mapper mediator configuration as shown below. 
    • Configuration: Script file that is used to execute the mapping.
    • Input Schema: JSON schema, which represents the input message format.
    • Output Schema: JSON schema, which represents the output message format.
    • Input Type: Expected input message type (xml/json/csv).
    • Output Type: Target output message type (xml/json/csv).


  10. 6. To Export as a C-APP right click on the DataMapperExampleCompositeApplication and select export. Then you can see below dialog box.
    Select Composite Application Archive [CAR] and click next.

  11. 7.  Give export destination and click finish.
  12. 8. Go to ESB management console (https://localhost:9443/carbon/).
  13. 9. Go to carbon Applications in main tab and select Add. Click Choose File and give the C-App which we have already exported and finally click Upload.


Invoking the created REST API


  1. 1. Open Postman REST client.
  2. 2. Enter the following details to create the client message, enter the content of the XML file as the payload in the text area provided, and click send as below.
    • URL:  http://<ESB_HOST>:<ESB_PORT>/convertMenu (Ex: http://172.17.0.1:8280/convertMenu)
    • Method: POST
    • Body: raw xml/application
    • Message: Enter the input


  1. You view the expected JSON message received as shown below. 


Tuesday, May 8, 2018

WSO2 Admin Services.

WSO2 products are internally manage by using SOAP Web services known as Admin Services. WSO2 products come with a management console UI, which communicates with these admin services to facilitate administration capabilities through the UI.
A service in WSO2 products is defined by the following components:
  • Service component: provides the actual service
  • UI component: provides the Web user interface to the service
  • Service stub: provides the interface to invoke the service generated from the service WSDL
There can be instances where you want to call back-end Web services directly. For example, in test automation, to minimize the overhead of having to change automation scripts whenever a UI change happens, developers prefer to call the underlying services in scripts. 

Discovering WSO2 Admin Services:


By default, the WSDLs of admin services are hidden from consumers. So we are going to discover them using OSGI console. Please follow below steps: 

1. Set the <HideAdminServiceWSDLs> element to false in <PRODUCT_HOME>/repository/conf/carbon.xml file.

2. Go to <PRODUCT_HOME>/bin/  folder and start the WSO2 product as follows,

  • In Linux environment:  sh wso2server.sh -DosgiConsole
  • In Windows environment:  wso2server.bat -DosgiConsole
3. When the server is started, hit the enter/return key several times to get the OSGI shell in the console.
4. In the OSGI shell, type: listAdminServices
5. The list of admin services of your product are listed as follows:


6. To see the WSDL of any admin service, select the admin service's URL and paste it in your browser with ?wsdl at the end. For example:
https://SL-PRABODP:8243/services/InboundAdmin?wsdl
Note : Replace SL-PRABODP with your local IP or localhost.
Then you can see it as below

And also you can create a soap project in SoapUI as well
Then you can see as below in soapUI
Then you can check all available functionalities using this soapUI

Invoking WSO2 admin service

WSO2 Admin services are secured using common types of security protocols. ex:
  • HTTP basic auth
  • WS-Security username token
  • session based authentication

For example,  UserAdmin service is secured with HTTP basic auth. to invoke a service, follow these steps:
  1. Authenticate yourself and get the session cookie.
  2. Generate client stubs to access the back-end web services.

How to generate client stubs:

There are several methods / tools to generate client stubs:
  • Using Axis2 client API - I will explain in this blog.
  • Using SoapUI (4.5.1 or later)
  • Using wsdl2java

Generate Client stubs using Axis2 client API

First you need to create AdminService.wsdl file for which admin service you need to create stubs. For an example here i'm going to create for stubs for InboundAdmin service.
wsdl file for InboundAdmin service: 

To create a client using ADB execute the following steps:

1. Download and unpack the Apache Axis2 Standard Distribution.
2. Create the client stub with the following command:
%AXIS2_HOME%\bin\wsdl2java -uri InboundAdmin.xml -p wso2.adminservices.stubs -d adb -s
Assuming that you have InboundAdmin.xml file on your current directory.
wso2.adminservices.stubs - you can change this as your package name.

3. Create the client (for example Client.java), a java application that uses the generated stub, and save it in wso2/adminservices/inboundadmin directory.
4. Build the client by typing: ant jar.client
5. Assuming you have a corresponding service, run the client by adding the generated InboundAdmin-test-client.jar file located in build/lib to the classpath and type: java wso2.adminservices.inboundadmin.Client

Sample reference for Client.java


Thursday, November 3, 2016

How to Install and Configure WSO2 EMM Server

Hello,

Here i'm going to describe how to install and configure WSO2 EMM server step by step.

What is WSO2 EMM Server?


https://docs.wso2.com/display/EMM201/About+WSO2+EMM

Architecture.

for more details go to this link : https://docs.wso2.com/display/EMM201/Architecture


Installing on Windows


Follow the instructions below to download the binary distribution of WSO2 EMM:
The binary distribution contains the binary files for both MS Windows and Linux-based operating systems, compressed into a single ZIP file. This distribution is recommended for many users. 
  1. In your web browser, go to http://wso2.com/products/enterprise-mobility-manager/
  2. Click the Download button in the upper right-hand corner of the page to download the latest version. To download an older version, click the Previous Releases link and then select the version that you want.
  3. Enter the required details in the form, and click Download.

System requirements

Memory
  • ~ 2 GB minimum
  • ~ 512 MB heap size. This is generally sufficient to process typical SOAP messages but the requirements vary with larger message sizes and  the number of messages processed concurrently.
Disk
  • ~ 1 GB, excluding space allocated for log files and databases.


Device OS prerequisites

Platform
Supported Versions
iOSVersion 7.0 - 9.0
Android
Version 4.1.x - 5.1
WindowsVersion 8.1

Follow the instructions below to install EMM on Windows.

Installing the required applications

  • Be sure your system meets the prerequisites . Java Development Kit (JDK) is essential to run the product.
  • Be sure that the PATH environment variable is set to "C:\Windows\System32", because the findstr windows exe is stored in this path.

Installing EMM

  1. If you have not done so already, download the latest version of the product as described in downloading the product.
  2. Extract the archive file to a dedicated directory for the product, which will hereafter be referred to as <PRODUCT_HOME>.

Setting JAVA_HOME

You must set your JAVA_HOME environment variable to point to the directory where the Java Development Kit (JDK) is installed on the computer. Typically, the JDK is installed in the  C:\Program Files\Java\ directory, such as C:\Program Files\Java\jdk1.8.0_101 . If you have multiple versions installed, choose the latest one, which you can find by sorting by date.

Skip to end of metadata
Go to start of metadata
Follow the sections below to run a WSO2 product as a Linux service:
  • Prerequisites
  • Setting up CARBON_HOME
  • Running the product as a Linux service

Prerequisites

Install JDK 1.6.24 or later or 1.7.* and set up the JAVA_HOME environment variable. 

Setting up CARBON_HOME

Extract the WSO2 product to a preferred directory in your machine and set the environment variable CARBON_HOME to the extracted directory location.

Running the product as a Linux service

  1. To run the product as a service, create a startup script and add it to the boot sequence. The basic structure of the startup script has three parts (i.e., start, stop and restart) as follows:
    Given below is a sample startup script. <PRODUCT_HOME> can vary depending on the WSO2 product's directory.
    In the above script, the server is started as a user by the name user1 rather than the root user. For example, su -c "${startcmd}" user1 
  2. Add the script to /etc/init.d/ directory.

    If you want to keep the scripts in a location other than /etc/init.d/ folder, you can add a symbolic link to the script in /etc/init.d/ and keep the actual script in a separate location. Say your script name is prodserver and it is in /opt/WSO2/ folder, then the commands for adding a link to /etc/init.d/ is as follows:
    • Make executable: sudo chmod a+x /opt/WSO2/prodserver 
    • Add a link to /etc/init.d/sudo ln -snf /opt/WSO2/prodserver /etc/init.d/prodserver
  3. Install the startup script to respective runlevels using the command update-rc.d. For example, give the following command for the sample script shown in step1:
    sudo update-rc.d prodserver defaults

    The defaults option in the above command makes the service to start in runlevels 2,3,4 and 5 and to stop in runlevels 0,1 and 6.
    runlevel is a mode of operation in Linux (or any Unix-style operating system). There are several runlevels in a Linux server and each of these runlevels is represented by a single digit integer. Each runlevel designates a different system configuration and allows access to a different combination of processes. 
  4. You can now start, stop and restart the server using service <service name> {start|stop|restart} command. You will be prompted for the password of the user (or root) who was used to start the service. 


Server Configurations


General server configurations

Follow the instructions below to configure general server configurations:
  1. Configure the monitoring frequency by configuring the MonitorFrequency parameter in the cdm-config.xml file, which is in the <EMM_HOME>/repository/conf directory. Specify this value in milliseconds. The EMM server uses this parameter to determine how often the devices enrolled with EMM need to be monitored. By default, this value has been configured to 60000ms (1min).
    Example:

  2. Configure the following fields that are under the <APIKeyValidator> tag in the <EMM_HOME>/repository/conf/api-manager.xml file.

    This step is only applicable in the production environment.
    • Configure the <serverURL> field by replacing ${carbon.local.ip} with the hostname or public IP of the production environment.

    • Configure the <RevokeAPIURL> field by replacing ${carbon.local.ip} with the hostname or public IP of the production environment.

  1. Enable HTTPS communication.  

    • This step is only required for the production environment. Once enabled, the HTTP requests will be redirected to use HTTPS automatically.
    • You will need to setup the BKS file in the android agent once HTTPS is enabled.
    1. To enable HTTPS redirection for a specific web application, uncomment the following code in the respective web application's web.xml.
      Example: Enable HTTPS redirection for the mdm-android-agent web app by navigating to the <EMM_HOME>/repository/deployment/server/webapps/mdm-android-agent/WEB-INF/web.xml file.

    1. To enable HTTPS redirection for the entire servlet container, configure the web.xml file, which is in the <EMM_HOME>/repository/conf/tomcat folder, by including the following:

WSO2 EMM email configurations

Configure the email settings to send out registration confirmation emails to new users and invite existing users to register their device with WSO2 EMM.

In EMM, user registration confirmation emails are disabled by default, and the admin needs to provide the required configuration details to enable it.
  1. Create an email account to send out emails to users that register with EMM (e.g., no-reply@foo.com).

    If you are using a Google mail account, you need to note that Google has restricted third party apps or less secure apps from sending emails. Therefore, you need to configure your account to enable this setting as WSO2 EMM acts as a third party application when sending emails to confirm user registrations or inviting existing users to register devices with WSO2 EMM.
  2. Open the <EMM_HOME>/repository/conf/axis2/axis2.xml file, uncomment the mailto transportSender section, and configure the EMM email account.

    For mail.smtp.frommail.smtp.user, and mail.smtp.password, use the email address, username, and password (respectively) from the mail account you set up.

  1. Configure the email sender thread pool.
    Navigate to the email-sender-config.xml file, which is in the <EMM_HOME>/repository/conf/etc directory, and configure the following fields under <EmailSenderConfig>.
    • MinThreads: Defines the minimum number of threads that needs to be available in the underlying thread pool when the email sender functionality is initialized.
    • MaxThreads: Defines the maximum number of threads that should serve email sending at any given time.
    • KeepAliveDuration: Defines the duration a connection should be kept alive. If the thread pool has initialized more connections than what was defined in MinThreads, and they have been idle for more than the KeepAliveDuration, those idle connections will be terminated
    • ThreadQueueCapacity: Defines the maximum concurrent email sending tasks that can be queued up.

  1. Customize the email templates that are in the <EMM_HOME>/repository/resources/email-templates directory. 

    The email templating functionality of WSO2 EMM is implemented on top of Apache Velocity, which is a free and open-source template engine.
    1. Open the email template that you wish to edit based on the requirement, such as the user-invitation.vm or user-registration.vm file.
    2. Edit the <Subject> and <Body> to suite your requirement.
    3. Restart WSO2 EMM.

    If you need to access HTTP or HTTPS base URLs of the server within your custom template configs, use the $base-url-http and $base-url-https variables, respectively.

WSO2 EMM Jaggery apps configurations to enroll and manage devices

In WSO2 EMM, only Android and iOS platforms use the agent to enroll devices with the EMM. The Windows platform uses the native workplace application to enroll devices with WSO2 EMM. Therefore, the following configurations steps are required only if you are registering or enrolling Android or iOS devices.
Follow the steps given below:
  1. Open the config.json file that is in the <EMM_HOME>/repository/deployment/server/jaggeryapps/ emm-web-agent/config directory.
  2. Configure the host attribute that is under generalConfig by providing the entire server address. 

    You are required to configure this file as it is used to handle device enrollments.

    • To download the EMM Android agent in a testing environment configure the host attribute using an HTTP URL, because the Android browser does not trust hosts with self-signed certificates. 
    • To download the EMM Android agent in a production environment configure the host attribute using an HTTPS URL as the production server has a Certificate Authority (CA) installed with a valid SSL certificate.

  1. Open the config.json file that is in the <EMM_HOME>/repository/deployment/server/jaggeryapps/emm/config directory.
  2. Configure the host attribute that is under generalConfig by providing the entire server address.

    You are required to configure this file as it is used to manage the devices.

    In a clustered environment, configure the host attribute by providing the entire server address (by changing only the protocol to HTTPS and the port to the HTTPS port) that was given for the host attribute in the emm-web-agent's config.json file. This is required because the EMM configurations refer to the emm-web-agent app as it is used to handle device enrollments.

WSO2 App Manager configurations to manage applications in WSO2 EMM

Follow the steps given below to configure WSO2 App Manager for the EMM:
  1. Open the carbon.xml file that is in the <EMM_HOME>/repository/conf directory.
  2. Uncomment the HostName attribute and provide the server IP.
    Default: 
    <!--HostName>www.wso2.org</HostName-->
    An example after the configuration:


  1. Uncomment the MgtHostName attribute and provide the server IP.
    Default:
    <!--MgtHostName>mgt.wso2.org</MgtHostName-->
    An example after the configuration:
  2. Comment the uncommented ServerURL and uncomment the ServerURL attribute that was commented by default.
    Configure the uncommented ServerURL as follows:
    1. Provide localhost as the value for {carbon.local.ip}.
    2. Provide the https port as the value for {carbon.management.port}.
      By default, the port is 9443.
    3. Remove ${carbon.context}.
    By default:
    <ServerURL>local:/${carbon.context}/services/</ServerURL>
    <!--
    <ServerURL>https://${carbon.local.ip}:${carbon.management.port}${carbon.context}/services/</ServerURL>
    -->
    An example after the configuration:

  1. Restart the WSO2 EMM server.
  2. Login to the WSO2 App Manager publisher to publish application or WSO2 App Manager store to install apps on mobile devices.

    • Access the WSO2 App Manager publisher:
      • http://localhost:9763/publisher
      • https://localhost:9443/publisher
    • Access WSO2 App Manager store
      • http://localhost:9763/store/
      • https://localhost:9443/store

SSO configurations

Follow the steps given below to configure single sign-on (SSO) for EMM:
  1. Enable SSO in the following configuration files, under the ssoConfiguration section:
    • config.json file, which is in the <EMM_HOME>/repository/deployment/server/jaggeryapps/emm/config directory.
    • store.json file, which is in the <EMM_HOME>/repository/deployment/server/jaggeryapps/store/config directory.
    • publisher.json file, which is in the <EMM_HOME>/repository/deployment/server/jaggeryapps/publisher/config directory.


  1. Configure the Identity Provider (IdP) in the following configuration files, under the ssoConfiguration section:

    For example, you can use the following steps to configure WSO2 Identity Server (IS) as an Identity Provider (IdP). 
    • config.json file, which is in the <EMM_HOME>/repository/deployment/server/jaggeryapps/emm/config directory.
    • store.json file, which is in the <EMM_HOME>/repository/deployment/server/jaggeryapps/store/config directory.
    • publisher.json file, which is in the <EMM_HOME>/repository/deployment/server/jaggeryapps/publisher/config directory. 


    By default, an Identity Provider (IdP) has been bundled with the EMM binary pack. If you wish to use this default IdP in EMM, modify the host/ip to the Server IP. If you wish to use your own IdP, modify the host/ip to your own IdP's host in the following files:
  2. Update the SSO related IDP configurations in the sso-idp-config.xml file, which is in the <EMM_HOME>/repository/conf/identity directory, by updating all the entries that state localhost to your IDP's IP address or domain.

  1. If you are running WSO2 EMM on a cluster setup or a virtual machine, you must configure the following fields under <SSOConfiguration> in the app-manager.xml file that is in the <EMM_HOME>/repository/conf directory.
    • IdentityProviderUrl
    • providerURL

    • By default, <EMM_HOST> is localhost. However, if you are using a public IP, the respective IP address or domain needs to be specified.
    • By default, <EMM_HTTPS_PORT> has been set to 9443. However, if the port offset has been incremented by n, the default port value needs to be incremented by n.


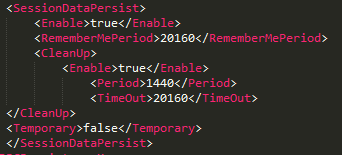
  1. Enable authentication session persistence by uncommenting the following configuration in the <EMM_HOME>/repository/conf/identity/identity.xml file, under the Server and JDBCPersistenceManager elements.

Starting the server


When starting WSO2 EMM, it is mandatory to have an active internet connection; otherwise, the devices will not be able to connect to EMM.
Follow the instructions below to start your WSO2 product based on the Operating System you use:

On Windows/Linux/Mac OS

To start the server, you run <EMM_HOME>/bin/wso2server.bat (on Windows) or <EMM_HOME>/bin/wso2server.sh (on Linux/Mac OS) from the command prompt as described below. Alternatively, you can install and run the server as a Windows or Linux service (see the related topics section at the end of this page).
  1. Open a command prompt by following the instructions below:
    • On Windows: Click Start -> Run, type cmd at the prompt, and then press Enter.
    • On Linux/Mac OS: Establish an SSH connection to the server, log on to the text Linux console, or open a terminal window.
  2. Navigate to the <EMM_HOME>/bin/ directory using the Command Prompt.
  3. Execute one of the following commands:
    • To start the server in a typical environment:
      • On Windows:  wso2server.bat --run
      • On Linux/Mac OS:  sh wso2server.sh
    • To start the server in the background mode of Linux: sh wso2server.sh start
      To stop the server running in this mode, you will enter: sh wso2server.sh stop
    • To provide access to the production environment without allowing any user group (including admin) to log into the Management Console:
      • On Windows: wso2server.bat --run -DworkerNode
      • On Linux/Mac OS: sh wso2server.sh -DworkerNode
    • To check for additional options you can use with the startup commands, type -help after the command, such as:
      sh wso2server.sh -help (see the related topics section at the end of this page).
  4. The operation log appears in the command window. When the product server has successfully started, the log displays the message "WSO2 Carbon started in 'n' seconds".


Accessing the EMM Console

Once the server has started, you can access the EMM Consoles. You can also use the EMM Console on this computer or from any other computer connected to the Internet or LAN.

When these pages appear, the web browser will typically display an "insecure connection" message, which requires your confirmation before you can continue.
The EMM consoles are based on the HTTPS protocol, which is a combination of HTTP and SSL protocols. This protocol is generally used to encrypt the traffic from the client to server for security reasons. The certificate it works with is used for encryption only, and does not prove the server identity, so when you try to access these consoles, a warning of untrusted connection is usually displayed. To continue working with this certificate, some steps should be taken to "accept" the certificate before access to the site is permitted. If you are using the Mozilla Firefox browser, this usually occurs only on the first access to the server, after which the certificate is stored in the browser database and marked as trusted. However, with other browsers, the insecure connection warning might be displayed every time you access the server.
This scenario is suitable for testing purposes, or for running the program on the company's internal networks. If you want to make these consoles available to external users, your organization should obtain a certificate signed by a well-known certificate authority, which verifies that the server actually has the name it is accessed by and that this server belongs to the given organization.

Signing into the EMM

  1. Start the server and access the EMM Console.
    https://<EMM_HOST>:<EMM_PORT>/emm
    • By default, <EMM_HOST> is localhost. However, if you are using a public IP, the respective IP address or domain needs to be specified.
    • By default, <EMMS_PORT> has been set to 9443 for HTTPS. However, if the port offset has been incremented by n, the default port value needs to be incremented by n.
  2. Enter the username. The super tenant administrator has to use admin as his/her username. While, the end-user has to use the username that was mentioned in the registration invitation email.
  3. Enter the password. The super tenant administrator has to use admin as the password. While, the end-user has to use the default password that was mentioned in the registration invitation email.
  4. Click LOG IN. The respective EMM Console will change, based on the permissions assigned to the user.
    Example: The EMM console for an administrator.

Signing out of the EMM

Click the user icon, and click LOG OUT. 
Example:

Stopping the server

To stop the server, press Ctrl+C in the command window.